
Cocoonの目次って、なんかシンプルすぎるなぁ。
Cocoonの目次は、簡単におしゃれ目次に変身できます!
Cocoonの目次は、CSSでデザインを変更できます。
ここでは、コピペで簡単におしゃれなデザインに設定できる方法を解説します。
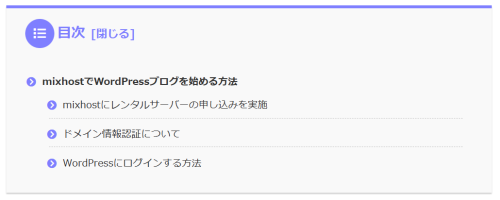
完成イメージ
目次の完成イメージは以下です。
カスタマイズ方法
Font Awesome(フォント オーサム)の変更
(1)Font Awesome(フォント オーサム)は、Webサイトにアイコン型のフォント(Webアイコンフォント)を提供しているサイトです。
Webアイコンフォントとは、画像を使用せずに表示できるアイコンです。ウェブページの文字と同じように色や大きさをCSSで変更できます。
Font Awesomeを使用する場合は、新しいバージョン5(Font Awesome 5)がオススメです。
| Webアイコンフォントの特徴 |
| ・テキストと同様に文中に挿入できる ・拡大してもボヤけない ・色の変更ができる ・サイズの変更ができる ・動きも追加できる(アニメーション効果) |
(2)Font Awesome 5に変更します。
ダッシュボードから「Cocoon設定」をクリックし、「全体」タブを選択します。

(3)①「Font Awesome 5」を選択し、②「変更をまとめて保存」をクリックします。

アイコンの選択方法
(1)以下のFont Awesomeサイトをクリックします。
Font Awesome 5 Free のアイコン検索は以下:
https://fontawesome.com/v5/search?m=free
参考: Free 版で使えるのは、月10,000ページビューまでです。≫ 詳しくはこちら
(2) はじめに「list」アイコンを選択します。
検索エリアに①「list」と入力します。
いろいろなlistアイコンが表示されますのが、ここでは先頭のアイコン②をクリックします。
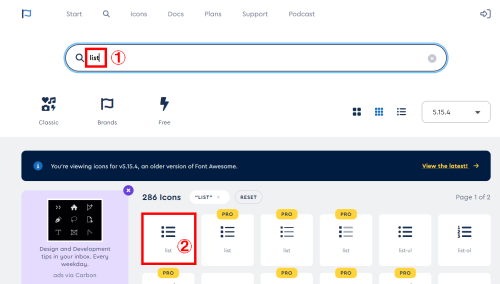
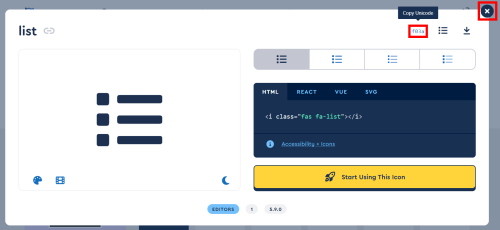
(3)Unicodeの「f03a」を記録しておき、後述のCSSで「content: “\f03a”;」と記入します。
「×」でウィンドウを閉じます。
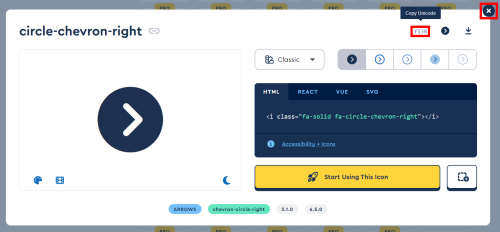
(4) 次にに矢印アイコンを選択します。
検索エリアに①「circle」と入力します。
いろいろな丸型のアイコンが表示されますのが、ここでは「circle-chevron-right」アイコン②をクリックします。
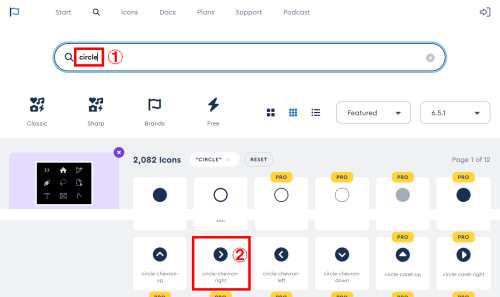
(5)Unicodeの「f138」を記録しておき、後述のCSSで「content: “\f138”;」と記入します。
「×」でウィンドウを閉じます。
CSSに追加
(1)アイコンの色や種類をお好みに変更し、以下のコードをコピーします。
/* 目次の変更 */
#main .entry-content .toc {
  /* 目次全体デザイン */
  /* 目次全体の背景色を変える場合は以下を変更 */
  background: #F9F9F9;
  border: none;
  display: block;
  border-top: 5px solid;
  border-top-color: #7f7fff;
  box-shadow: 0 2px 2px rgba(0, 0, 0, 0.2);
  padding: 20px 25px;
}

#main .entry-content .toc .toc-title {
  /* 目次の文字指定 */
  text-align: left;
  margin: 0 20px 20px -10px;
  padding-left: -20px;
  font-size: 23px;
  font-weight: 700;
  /* 目次の文字色を変える場合は以下を変更 */
  color: #7f7fff;
}

#main .entry-content .toc .toc-title:before {
  /* 目次のアイコン設定 */
  top: 0;
  left: -45px;
  width: 50px;
  height: 50px;
  font-family: "Font Awesome 5 Free";
  /* アイコンを変える場合は以下を変更 */
  content: "\f03a";
  font-size: 20px;
  margin-right: 5px;
  /* アイコンの色を変える場合は以下を変更 */
  color: #FFF;
  /* アイコンの背景色を変える場合は以下を変更 */
  background-color: #7f7fff;
  border-radius: 50%;
  -webkit-border-radius: 50%;
  -moz-border-radius: 50%;
  padding: 14px;
}

#main .entry-content .toc .toc-content ol {
  /* 目次のデザインカスタマイズ */
  padding: 0 0.5em;
  position: relative;
}

#main .entry-content .toc .toc-content ol li {
  line-height: 1.5;
  padding: 0.7em 0 0.5em 1.4em;
  border-bottom: dashed 1px silver;
  list-style-type: none !important;
}

#main .entry-content .toc .toc-content ol li:before {
  /* 目次の各節の先頭にあるアイコンを設定 */
  font-family: "Font Awesome 5 Free";
  /* アイコンを変える場合は以下を変更 */
  content: "\f138";
  position: absolute;
  left: 0.5em;
  /* 色を変える場合は以下を変更 */
  color: #7f7fff;
  font-weight: bold;
}

#main .entry-content .toc .toc-content ol li:last-of-type {
  border-bottom: none;
}

#main .entry-content .toc .toc-content .toc-list li {
  /* h2のみ太文字に */
  font-weight: 700;
}

#main .entry-content .toc .toc-content .toc-list li li {
  /* h3以降の文字サイズを普通に */
  font-weight: normal;
}(2)ダッシュボードから「外観」をクリックし、「追加CSS」を選択します。

(3)「追加CSS」をクリックします。

(4)行の最後にコピーしたCSSを貼り付け、「公開」をクリックします。
